Unfolding the Sunshine: How to Create Stunning 3D Summer Decor with Layered SVG Designs
As the days grow longer and the air begins to warm, there is a collective shift in our creative energy toward brighter colors, lighter materials, and designs that evoke the feeling of vacation. One of the most popular trends in the crafting world right now is the use of 3D Summer SVG files. These digital templates allow crafters to transform simple sheets of paper into intricate, multi-dimensional art pieces that capture the essence of the season. Whether you are a seasoned scrapbooker or a beginner holding your first cutting machine for the first time, understanding how to utilize these layered designs can elevate your home decor and gift-giving game.
The beauty of this specific design lies in its simplicity and its depth. It is not just a flat image; it is an experience built layer by layer. In this guide, we will explore what makes 3D layered cardstock projects so special, how to execute them using standard materials, and why having versatile file formats is crucial for your crafting workflow.
What is a 3D Layered SVG?
To understand the value of a 3D Summer SVG, one must first understand the concept of "layering." In digital design, an SVG (Scalable Vector Graphic) is a file type that uses mathematical equations to define shapes, allowing it to be resized without losing quality. When applied to physical crafting, an SVG is sent to a cutting machine—such as a Cricut or Silhouette—to cut out specific shapes from material like cardstock.
A "3D" design takes this a step further. Instead of cutting out a single silhouette, the design is broken down into multiple distinct layers. Think of it like a digital version of a pop-up book or a shadow box. Each layer represents a different depth plane. By stacking these layers on top of one another with small spacers or adhesive dots, the final product gains physical depth, shadows, and visual interest that a flat print simply cannot achieve.
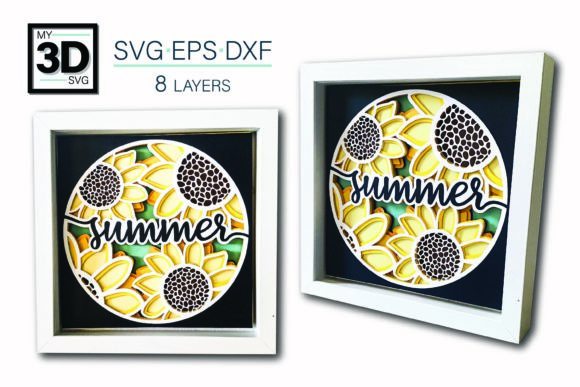
This particular summer-themed design utilizes an 8-layer structure. This means the final piece is composed of eight separate cuts that come together to form a cohesive image. The complexity sounds daunting, but the process is methodical and incredibly rewarding.
Why Choose Standard 8.5x11 Cardstock?
One of the most accessible aspects of this project is the material requirement. You do not need expensive specialty papers or large-format equipment. The instructions specify the use of standard 8.5x11 cardstock. This is significant for several reasons:
- Accessibility: Standard letter-size cardstock is available at almost any office supply store, craft shop, or online retailer. There is no need to hunt for obscure sizes.
- Cost-Effectiveness: Because the material is standard, the cost per project remains low. This makes it easy to experiment with different color combinations without breaking the bank.
- Manageability: For beginners, working with smaller sheets is less intimidating than handling large rolls of vinyl or massive poster boards. It allows for precise handling and easier storage of finished pieces.
Using standard paper also ensures that your cutting mats fit perfectly within your machine’s capabilities, reducing the risk of alignment errors that can occur when trying to force larger designs into smaller spaces.
The Art of Color Variation
While the structural integrity of the design comes from the layers, its personality comes from the colors. The prompt for this design explicitly invites you to "change the colors around and see how the design changes." This is not just a suggestion; it is a core part of the creative process.
In layered designs, color contrast is key to readability. If two adjacent layers are too similar in shade, the depth effect disappears, and the image may look muddy. However, if you choose complementary colors—such as a bright yellow sun against a deep blue sky—the 3D effect pops, creating a vibrant focal point.
Experimentation Tips:
- Analogous Schemes: Use colors next to each other on the color wheel (e.g., pink, purple, and blue) for a calm, cohesive look.
- Complementary Schemes: Use opposite colors (e.g., orange and blue) to create high energy and contrast, perfect for summer themes.
- Monochromatic Schemes: Use different shades of a single color to create a sophisticated, modern aesthetic where the focus is purely on the shape and depth.
By mixing and matching hues, you can turn the same SVG file into dozens of unique decorations suitable for different rooms, moods, or occasions.
Technical Specifications and File Formats
For a project to be truly useful, it must be compatible with the tools you already own. This 3D Summer SVG is designed with versatility in mind, ensuring that regardless of your preferred software, you can bring this design to life. Here is a breakdown of the included file formats and their specific uses:
SVG - Cricut Design Space
The SVG format is the industry standard for Cricut users. When uploaded to Cricut Design Space, the layers are typically separated automatically, allowing you to assign different colors to each layer easily before sending the job to the cutter. This is ideal for users who prefer a streamlined, cloud-based workflow.
DXF - Silhouette Studio
If you are a fan of the Silhouette brand, the DXF (Drawing Exchange Format) is your best friend. This format is natively supported by Silhouette Studio. Like the SVG, it preserves the layer information, allowing you to edit the paths and adjust the spacing between layers if you wish to customize the depth of the final piece.
EPS - Adobe Illustrator, Make the Cut, Corel Draw, and Inkscape
The EPS (Encapsulated PostScript) format is a powerhouse for professional designers and advanced users. It opens seamlessly in Adobe Illustrator, CorelDRAW, and Make the Cut. For those who prefer free software, Inkscape also supports EPS files. This format is excellent if you plan to make significant modifications to the design, such as adding text, resizing elements, or combining this summer design with other graphics.
Support and Instructions
Even with clear instructions, crafting complex layered projects can present questions. That is why support is a vital part of the package. All cardstock designs come with a comprehensive PDF of instructions. This document is not merely a list of steps; it is a visual guide that walks you through the assembly process.
The PDF typically includes:
- Layer Identification: Clear labels telling you which color corresponds to which layer number.
- Assembly Order: Step-by-step guidance on which piece goes on top of which, ensuring the 3D effect aligns correctly.
- Adhesive Tips: Recommendations on whether to use glue dots, foam tape, or liquid adhesive to achieve the desired height between layers.
Furthermore, the creator emphasizes a commitment to customer satisfaction. If you encounter any hurdles during the cutting or assembly process, you are encouraged to reach out at any time. This direct line of communication ensures that you are never stuck, turning a potential frustration into a learning opportunity.
Integrating 3D Craft into Modern Life
Why go through the effort of creating 3D paper crafts in an increasingly digital world? The answer lies in the human desire for tactile experiences. In our daily lives, we are surrounded by screens and flat images. Creating a physical object engages our hands, our eyes, and our patience, providing a meditative break from the fast pace of modern work and education.
These 3D Summer decorations serve a practical purpose beyond aesthetics. They can be used as:
- Home Decor: Placed on shelves, desks, or windowsills to add a seasonal touch to your living space.
- Gifts: Handmade items carry emotional weight. A layered summer scene makes for a thoughtful, personalized gift for friends and family.
- Educational Tools: Teachers can use these designs in classrooms to teach geometry, spatial reasoning, and following instructions.
Ultimately, this 3D Summer SVG is more than just a collection of vector paths. It is an invitation to slow down, experiment with color, and engage in the timeless joy of making something with your own hands. With the right files, standard materials, and a willingness to learn, you can create stunning decor that brings the warmth of summer indoors all year round.