3D Flower Field - 3d Butterfly
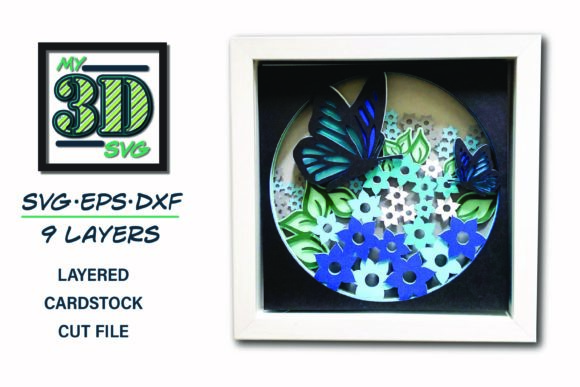
Crafting projects often require more than just a single image file; they demand structural integrity and visual depth. The 3D Flower Field - 3d Butterfly layered SVG is specifically engineered to address the need for dimensional cardstock art. Unlike flat vector designs, this asset consists of nine distinct layers that, when cut and assembled correctly, create a parallax effect. This technique transforms a static design into a dynamic piece that catches light and shadow, making it particularly effective for greeting cards, scrapbook embellishments, and decorative wall art.
For professionals in the crafting space, including small business owners selling on platforms like Etsy or independent creators producing custom orders, understanding how to manage multi-layer files is crucial. Efficiency in production relies heavily on the quality of the source file and the clarity of the workflow. A well-structured SVG allows for rapid iteration and consistent output, reducing the time spent troubleshooting cutting errors or misaligned layers.
Understanding the File Structure and Compatibility
The core value of this digital asset lies in its versatility across different software ecosystems. When you acquire the 3D Flower Field - 3d Butterfly, you are not receiving a single format but a comprehensive package designed to integrate seamlessly into various professional workflows. The inclusion of multiple file formats ensures that users can work within their preferred environment without losing fidelity or requiring complex conversion steps.
- SVG: This is the primary format for use with Cricut Design Space. It is optimized for direct import, allowing users to immediately access the layer stack. For those using vinyl cutters or laser engravers that support SVG, this format provides clean paths and accurate scaling.
- DXF: Essential for users of Silhouette Studio. The DXF version ensures that the node structure remains intact, which is vital for precise cutting operations. This compatibility broadens the user base significantly, as many hobbyists and semi-professionals rely on Silhouette machines.
- EPS: This format serves designers who utilize Adobe Illustrator, Make the Cut, CorelDRAW, or Inkscape. EPS files preserve vector data at a high level, allowing for further customization before cutting. If a creator wishes to modify the petal shapes or adjust the spacing between layers, starting with an EPS file offers the necessary flexibility.
By providing these three formats, the asset supports a flexible planning phase. A designer might sketch initial concepts in Illustrator using the EPS file, then export the final layout as an SVG for production on a Cricut machine. This interoperability reduces friction in the creative process, ensuring that the tool adapts to the user’s existing infrastructure rather than forcing a change in methodology.
Strategic Color Planning and Material Selection
One of the most significant advantages of a nine-layer design is the potential for color variation. The instruction to "mix up the colors" is not merely aesthetic advice; it is a functional strategy for enhancing depth perception. In physical construction, contrasting hues help distinguish individual layers, especially when the elements overlap. However, monochromatic schemes can also be effective if the material texture or finish varies between layers.
When preparing for production, consider the following factors regarding material choice:
- Cardstock Weight: Standard 80lb to 110lb cardstock is typically sufficient for individual layers. Using heavier stock may cause the layers to bulge excessively, while lighter paper might lack the rigidity needed to hold the 3D shape. Consistency in weight across all nine layers is critical to ensure even stacking.
- Color Theory Application: To maximize the 3D effect, place darker shades in the background layers and lighter shades in the foreground. This mimics natural lighting conditions where distant objects appear darker due to atmospheric perspective. Alternatively, using analogous colors creates a harmonious blend, while complementary colors create a vibrant, high-contrast focal point.
- Texture Integration: Consider using patterned papers for specific layers. For instance, a subtle floral pattern on the backmost flower layers can add complexity without overwhelming the central butterfly element. The key is to maintain visual hierarchy so the eye is drawn to the main subject.
This stage of planning occurs before any cutting takes place. By defining the color palette and material list in advance, you minimize waste and streamline the assembly process. It is a practical application of project management principles: define resources, allocate them efficiently, and execute with precision.
Workflow Integration and Assembly Process
Integrating the 3D Flower Field - 3d Butterfly into a production workflow requires attention to detail during both the digital preparation and physical assembly phases. The transition from screen to physical object involves several critical checkpoints.
Digital Preparation
Once the file is imported into your chosen software (e.g., Cricut Design Space), verify the layer order. In a 3D design, the bottom-most layer in the digital stack usually corresponds to the rearmost physical layer. Ensure that the layers are separated correctly and that no unintended unions or groups have merged distinct elements. Check the alignment of the center points; if the layers are not perfectly centered, the final product will look skewed. Use the grouping tools to keep related flowers together if you plan to cut them as separate clusters, but ensure the overall composition remains balanced.
Physical Cutting and Sorting
After cutting, organization becomes paramount. With nine layers, it is easy to lose track of which piece belongs where. Implement a sorting system immediately after cutting. You might arrange the pieces on a mat in reverse order of assembly, or use labeled envelopes for each layer. This step is crucial for maintaining consistency, especially if you are producing multiple units for sale or gifting. Consistent organization reduces cognitive load during assembly, allowing you to focus on the structural integrity of the build.
Assembly Techniques
The assembly of a 3D layered design relies on adhesive application. Foam tape is the standard tool for creating depth, but the thickness of the foam must be chosen carefully. Too thick, and the layers may bow outward, distorting the shape; too thin, and the dimensionality is lost. Apply adhesive sparingly to avoid seepage through the edges of delicate petals. Start from the back layer and work forward, pressing firmly to ensure adhesion. Allow adequate drying time between layers if using liquid adhesives, though foam tape generally sets quickly.
Quality Control and Long-Term Utility
For entrepreneurs and educators, the longevity and reusability of digital assets are important considerations. A high-quality SVG file should remain editable and compatible with future software updates. The 3D Flower Field - 3d Butterfly is designed with standard vector paths, ensuring that it remains usable regardless of platform evolution. This makes it a sustainable investment for your digital library.
In terms of quality control, always produce a test cut before committing to premium materials. Paper can behave differently depending on humidity and grain direction. A test run helps identify any issues with blade pressure or alignment settings specific to your machine. This proactive approach saves time and resources in the long run.
Furthermore, this design offers educational value. For teachers or workshop leaders, it serves as an excellent example of geometric layering and spatial reasoning. Students can learn about scale, proportion, and the impact of color on perception by manipulating the layers themselves. The tactile nature of the project reinforces learning outcomes in a way that digital-only tasks cannot.
Conclusion on Implementation
The 3D Flower Field - 3d Butterfly is more than just a decorative image; it is a structured system for creating dimensional art. Its success depends on proper file handling, strategic color planning, and meticulous assembly. By treating the creation process as a workflow—complete with preparation, execution, and review—you can achieve professional results consistently. Whether used for personal enjoyment, educational purposes, or commercial products, this layered SVG provides the tools necessary to bring a flat concept into three-dimensional reality. Embrace the flexibility of the provided formats, experiment with color combinations, and prioritize organization throughout the process to unlock the full potential of this design.